Bathroom Backsplash Guide for a Flawless Tile Installation
Posted by Mike Belk on Nov 13, 2025

Bathroom remodels often come with unexpected twists, yet one task that truly transforms the space is a new backsplash. A carefully installed backsplash not only protects your walls from moisture but also adds a layer of style and value to your bathroom. With over 60% of homeowners reporting increased satisfaction after upgrading their bathroom backsplash, knowing how to plan and execute each step accurately can make your project smoother and more rewarding. Get ready to tackle your installation with confidence from the very beginning.
Table of Contents
- Step 1: Assess And Measure Your Backsplash Area
- Step 2: Select The Ideal Tile And Materials
- Step 3: Prepare Your Bathroom Surface Properly
- Step 4: Install Tiles With Precision And Care
- Step 5: Grout And Seal For Lasting Durability
- Step 6: Inspect And Clean To Ensure Perfection
Quick Summary
| Key Point | Explanation |
|---|---|
| 1. Precise measurements are essential | Accurate measurements prevent tile waste and shortages, ensuring a perfect fit for your backsplash area. |
| 2. Choose moisture-resistant tiles | Select tiles like ceramic or porcelain that handle humidity well, ensuring durability in bathroom environments. |
| 3. Proper surface preparation is key | Clean and level surfaces before installation to achieve a smooth and professional finish for your tile work. |
| 4. Allow adhesive to fully set | Wait 24 to 48 hours after tile placement before grouting to ensure the adhesive bonds properly for lasting durability. |
| 5. Final inspection enhances quality | Check alignment and clean grout haze post-installation for a polished look that enhances your bathroom’s aesthetic. |
Step 1: Assess and Measure Your Backsplash Area
Successful bathroom backsplash installation starts with precise measurements. According to Angi, accurate measurements ensure you purchase the right amount of tile without unnecessary waste or unexpected shortages.
To get started, you will need a metal tape measure, pencil, and notepad. Measure the length of each wall section from edge to edge, including areas behind sinks, stoves, or other fixtures. Carefully record the height from the countertop to the bottom of your cabinets or desired endpoint of your backsplash. Pro tip: Measure twice to confirm accuracy. When calculating total square footage, multiply the length by the height for each wall section and add them together.
Always account for obstacles like electrical outlets, windows, or other interruptions that might impact your tile layout. As you measure, sketch a rough diagram of your backsplash area to help visualize the space and plan your tile placement strategically. Learn more about tile installation with our comprehensive guide on how to install backsplash tile like a pro.
Remember to add an extra 10% to your total square footage to accommodate cuts, potential breakage, and future repairs. This small buffer will save you headaches during the installation process and ensure you have enough material to complete your project smoothly.
Step 2: Select the Ideal Tile and Materials
Choosing the right tile and materials is crucial for creating a stunning and functional bathroom backsplash. According to American Tin Ceilings, selecting appropriate tile patterns can significantly enhance visual appeal, especially in compact areas.
When selecting materials, consider durability, moisture resistance, and aesthetic compatibility with your bathroom design. Ceramic, porcelain, glass, and natural stone are popular choices, each offering unique benefits. Ceramic and porcelain tiles provide excellent water resistance and come in numerous styles. Glass tiles create a modern, reflective look, while natural stone offers a more organic feel. Explore our comprehensive guide to top tile finishes to help you make an informed decision.
DIY Splashbacks recommends considering thermal expansion and leaving small gaps around edges for materials like glass. Pro tip: Always purchase 10% extra tiles to account for cuts, breakage, and future repairs. Consider the overall color scheme, texture, and how the tile will complement your existing bathroom fixtures and countertops. Your tile selection should not only look beautiful but also withstand the moisture and occasional splashes typical in bathroom environments.
Step 3: Prepare Your Bathroom Surface Properly
Before installing your backsplash, proper surface preparation is critical to ensuring a flawless and long lasting tile installation. According to CDN Origin, thorough wall cleaning to remove grease and ensuring completely dry surfaces are fundamental first steps in the preparation process.
Corley Designs recommends carefully examining your wall for any irregularities like curves, bumps, or uneven surfaces. Begin by removing outlet covers, cleaning the entire surface with a degreasing cleaner, and allowing it to dry completely. Use a level to check wall flatness and sand down any significant bumps or protrusions. For slightly uneven surfaces, consider using a thin layer of mortar or tile backer board to create a smooth substrate. Learn more about bathroom renovation considerations with our comprehensive guide.
Pro tip: Install a temporary ledger board at the bottom of your backsplash area to support tiles during installation and ensure they remain perfectly level. This simple technique will help you achieve a professional looking finish by maintaining consistent alignment throughout your tile installation. Take your time with surface preparation as it forms the foundation for a beautiful and durable bathroom backsplash.
![]()
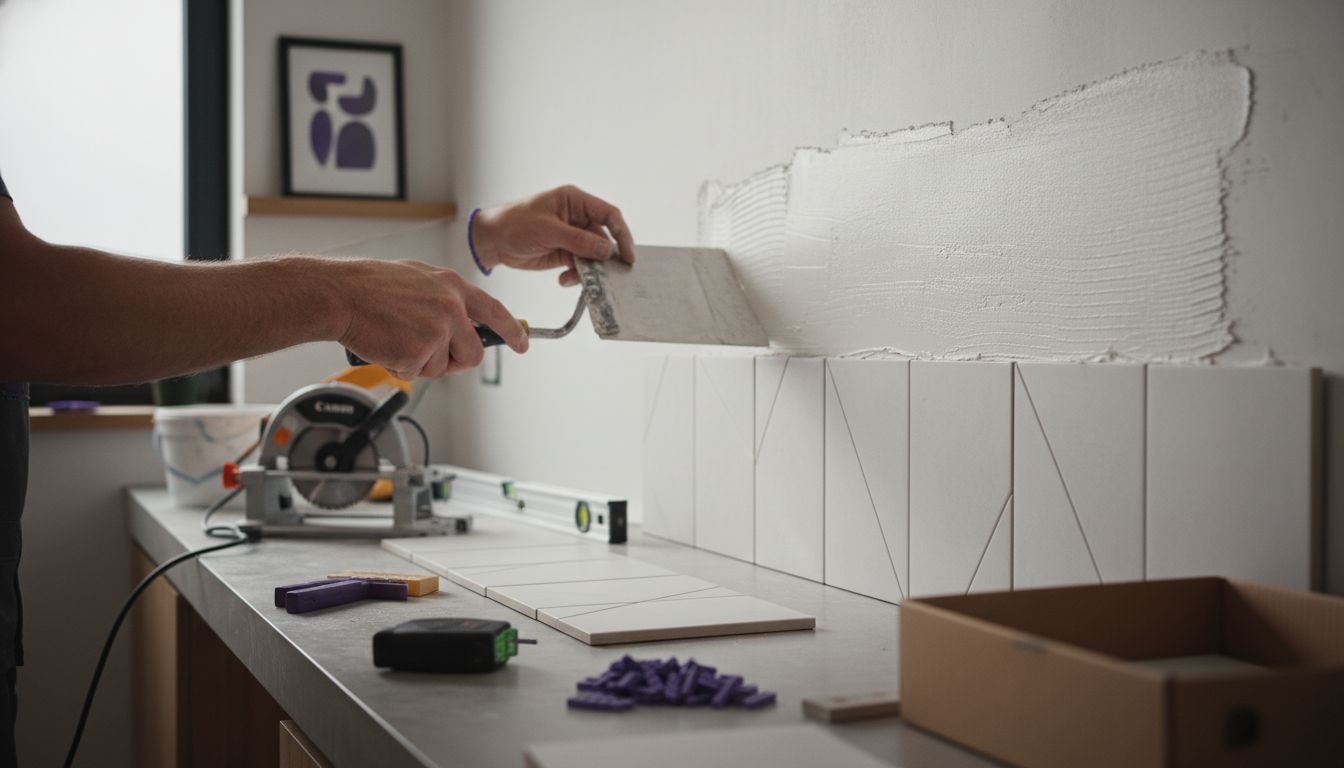
Step 4: Install Tiles with Precision and Care
According to Angi, successful tile installation requires meticulous planning and precision. Begin by laying out your tiles dry first to visualize the final pattern and identify potential cutting requirements before applying any adhesive.
Start at the bottom center of your backsplash and work outwards, using spacers to maintain consistent grout lines. Apply tile adhesive with a notched trowel held at a 45 degree angle to create uniform ridges. Press each tile firmly into the adhesive, wiggling slightly to ensure complete coverage. For cuts around outlets or edges, use a wet tile saw for clean precise edges. Explore our comprehensive guide for essential tile installation tips to help you achieve professional results.
Pro tip: Allow the adhesive to set completely before applying grout typically 24 to 48 hours. When grouting work in small sections applying at a 45 degree angle and wiping excess immediately with a damp sponge. This approach prevents grout from hardening on tile surfaces and ensures a clean polished finish. Take your time and work methodically for a backsplash that looks like it was installed by a professional.
Step 5: Grout and Seal for Lasting Durability
According to CDN Origin, proper grouting and sealing are critical to protecting your newly installed backsplash and ensuring its long term durability. Wait at least 24 hours after tile installation before beginning the grouting process to allow adhesive to set completely.
Corley Designs emphasizes the significance of selecting the right sealant for your specific tile type. Begin by mixing grout according to manufacturer instructions, applying it diagonally across tile joints using a rubber float. Remove excess grout with a damp sponge, being careful not to dig out grout from between tiles. Learn the details of tile grout sealing with our comprehensive guide.
Pro tip: After grout has dried completely typically 48 to 72 hours apply a high quality penetrating sealer to protect against moisture and stains. Use a small foam brush or roller for even application, wiping away excess immediately. Allow the sealer to cure for at least 24 hours before exposing the backsplash to water or heavy use. This final step will help maintain the beauty and integrity of your bathroom backsplash for years to come.
Step 6: Inspect and Clean to Ensure Perfection
According to CDN Origin, thorough inspection and cleaning are the final critical steps in achieving a professional grade backsplash installation. Wait until the grout has completely set before beginning your final inspection to ensure you can accurately assess the entire surface.
Corley Designs recommends a systematic approach to final inspection. Start by checking tile alignment using a level and examining grout lines for consistency. Look closely for any uneven tiles, excess grout, or small imperfections that can be addressed while they are still fresh. Use a soft cloth and appropriate tile cleaner to remove any grout haze or adhesive residue. Check out our guide on maintaining spotless bathroom tiles.
Pro tip: Create a cleaning solution using warm water and a pH neutral tile cleaner. Avoid abrasive materials or harsh chemicals that could damage your new backsplash. Gently clean the surface using circular motions with a soft microfiber cloth, paying extra attention to grout lines. Allow the surface to dry completely and admire your beautifully installed bathroom backsplash that will enhance your space for years to come.
Achieve a Flawless Bathroom Backsplash with the Right Tiles and Support
Installing a bathroom backsplash that looks professional and lasts requires more than just careful measuring and precise tiling. The article highlights common challenges like selecting durable materials that withstand moisture and ensuring perfect tile alignment for a polished finish. These pain points can leave you feeling overwhelmed and unsure where to start, especially when the right tile choice plays such a vital role.
At BELK Tile, we understand the importance of both style and durability in bathroom backsplash projects. Explore our extensive collection of high-quality tiles including ceramic, porcelain, glass mosaic, and natural stone options designed to elevate your space while withstanding bathroom conditions. Whether you are a first-time installer or a seasoned pro, our detailed product listings, inspirational options, and expert tips make the selection process simple and confident. Don’t wait until you run out of tile or struggle with unsuitable materials. Visit us now at BELK Tile to find the perfect tiles, get inspired, and start your flawless bathroom backsplash journey today.
Frequently Asked Questions
How do I measure the backsplash area accurately?
To measure your backsplash area accurately, use a metal tape measure to record each wall section’s length and height. Multiply the length by the height for each section and add them together to calculate the total square footage. Be sure to measure twice to confirm your accuracy before purchasing any tiles.
What type of tile is best for a bathroom backsplash?
Ceramic, porcelain, glass, and natural stone are popular options for bathroom backsplashes due to their durability and moisture resistance. Select a tile that complements your bathroom design while ensuring it can withstand the typical humid environment. Consider your aesthetic preferences and needed durability when making your choice.
How do I prepare my bathroom surface before tile installation?
Properly prepare your bathroom surface by cleaning it thoroughly to remove any dirt, grease, or debris. Inspect for any irregularities and use a level to ensure flatness; sand down any bumps if necessary. Also, it’s useful to install a temporary ledger board along the bottom to support the tiles during installation.
What is the proper method for applying grout after tiling?
After allowing the tile adhesive to set for 24 to 48 hours, mix your grout according to the package instructions and apply it diagonally across the tile joints with a rubber float. Remove excess grout promptly with a damp sponge, working in small sections to maintain a clean finish without digging out grout from the joints.
How can I maintain my bathroom backsplash after installation?
To maintain your bathroom backsplash, regularly clean it with warm water and a pH-neutral cleaner using a soft cloth. Avoid abrasive materials that could damage the tiles. Additionally, consider sealing the grout annually to protect against moisture and stains for long-lasting beauty.
What are the common mistakes to avoid during backsplash installation?
Common mistakes during backsplash installation include not measuring accurately, neglecting surface preparation, and rushing the grouting process. To avoid these issues, take your time to prepare surfaces and double-check all measurements before starting. Always allow adhesive and grout to cure fully as per the recommendations to ensure a long-lasting installation.
Recommended


