How to Select Grout Color for Your Home Project
Posted by Mike Belk on Oct 11, 2025

Choosing grout color might sound like a small detail, but it shapes the entire mood of your room. People get so obsessed with tile that they forget grout covers almost as much surface area—and can make or break your design. The wild part is that grout is more than just filler: the right color completely changes how your tile looks in different lighting and blends or boldly contrasts even the most intricate patterns.
Table of Contents
- Step 1: Assess Your Tile Color And Texture
- Step 2: Consider The Overall Design Theme
- Step 3: Evaluate Lighting Conditions
- Step 4: Test Grout Samples On Site
- Step 5: Finalize Grout Color Choice
Quick Summary
| Key Point | Explanation |
|---|---|
| 1. Assess tile color and texture first | Examine the tile’s color and texture in different lighting to select a suitable grout color that enhances the overall aesthetics. |
| 2. Align grout with design theme | Choose a grout color that complements other design elements like walls and fixtures, maintaining visual harmony in the space. |
| 3. Evaluate light’s impact on colors | Test grout colors under various lighting conditions to see how they interact with tile colors at different times of day. |
| 4. Conduct on-site grout testing | Apply grout samples in small test areas of the actual installation to visualize how they work with the tiles and overall space. |
| 5. Finalize grout choice methodically | Review all gathered insights and confirm your final grout color through an evaluation process, ensuring it meets aesthetic and practical needs. |
Step 1: Assess Your Tile Color and Texture
Selecting the perfect grout color begins with a comprehensive assessment of your tile’s unique characteristics. This initial step involves carefully examining your tile’s color, texture, and overall visual composition to create a harmonious design that enhances your space’s aesthetic appeal. Your tile’s physical attributes will serve as the primary guide for choosing a complementary grout color that either blends seamlessly or creates an intentional visual contrast.
Start by gathering your tile samples and placing them in the actual space where they will be installed. Natural and artificial lighting can dramatically alter color perception, so observe the tiles under different lighting conditions throughout the day. Pay close attention to the tile’s primary color tone, surface texture, and any variations or patterns within the individual pieces. Explore unique tile surface designs to understand how different textures can influence your grout color selection.
For tiles with complex patterns or multiple color variations, consider the dominant color and the secondary tones. Neutral tiles often provide the most flexibility in grout color selection, while bold or highly pigmented tiles might require a more strategic approach. Tiles with significant texture variation might benefit from a grout color that matches the tile’s primary tone, which helps create a more unified and cohesive visual effect.
If you are working with natural stone or handcrafted ceramic tiles, the inherent color variations can be more pronounced. In these cases, a neutral grout color can help balance the tile’s organic complexity without competing with its intrinsic beauty. Lighter colored tiles typically look best with grout that is slightly darker or matches the tile’s lightest shade, while darker tiles can accommodate both light and dark grout options depending on the desired visual impact.
Before making a final decision, collect several grout color samples and place them directly next to your tile samples. Observe how the colors interact in different lighting conditions and from various angles. This hands-on approach will give you the most accurate representation of the potential final result and help you make a confident, informed choice that complements your tile’s unique characteristics.
Step 2: Consider the Overall Design Theme
After assessing your tile’s unique characteristics, the next critical step in selecting the perfect grout color involves understanding and aligning with your space’s overall design theme. Your grout color is not just a functional element but a powerful design component that can dramatically influence the room’s aesthetic harmony and visual narrative. This step requires a thoughtful approach that considers the broader architectural style, color palette, and emotional atmosphere you want to create.
Begin by evaluating the existing design elements in your space. Consider the color of your walls, cabinets, countertops, and other permanent fixtures. Your grout color should complement these elements without creating visual competition. For modern, minimalist spaces, consider neutral grout colors like light gray or soft white that provide a clean, understated backdrop. Learn more about bold kitchen design coordination to understand how design elements work together.
Traditional or rustic environments might benefit from warmer, earthier grout tones that echo natural materials like sand, taupe, or soft browns. These colors can create a sense of warmth and continuity, especially in spaces with wooden elements or natural stone surfaces. Contemporary or industrial-style spaces often look striking with high-contrast grout colors, such as dark charcoal against light tiles or crisp white grout paired with bold, colorful tiles.
Consider the room’s intended atmosphere and functional requirements. Bathrooms and kitchens, which encounter more moisture and potential staining, might require grout colors that are more forgiving and can mask minor dirt or water marks. Lighter grout colors can make a small space feel more open and airy, while darker grout can add depth and drama to larger areas. The texture and size of your tiles also play a crucial role in this decision, as smaller tiles with more grout lines will have a more significant visual impact from your chosen color.
To verify you’ve successfully matched your grout color to the design theme, step back and view the space holistically. The grout should feel like a natural extension of your design, neither overwhelming the tiles nor disappearing completely. Create visual mockups or use design visualization tools to preview different grout color options. Trust your aesthetic instincts while remaining open to professional advice from interior design experts who can provide nuanced insights into color theory and spatial design.
Step 3: Evaluate Lighting Conditions
Lighting is a transformative element that can dramatically alter the appearance of your tile and grout color selection. Understanding how different light sources interact with your chosen materials is crucial for making an informed decision that maintains its visual appeal throughout the day and under various illumination conditions. This step requires a strategic approach to observing and analyzing how light impacts your tile and potential grout color combinations.
Begin by recognizing that lighting is not a static factor but a dynamic element that changes throughout the day. Natural sunlight, which shifts in intensity and angle from morning to evening, can reveal unexpected nuances in both tile and grout colors. According to preservation experts, lighting can significantly influence color perception and material appearance. Conduct a comprehensive lighting assessment by examining your tile samples at different times of day and under various light sources.
Prepare a detailed lighting evaluation by collecting grout color samples and positioning them alongside your tiles near windows, under artificial lights, and in areas with mixed lighting conditions. Pay special attention to how natural daylight, fluorescent lighting, LED lights, and evening ambient lighting interact with your tile and potential grout colors. North-facing rooms typically receive cooler, more consistent light, while south-facing spaces experience warmer, more intense illumination that can dramatically transform color appearances.
For spaces with complex lighting scenarios, consider the impact of artificial lighting fixtures. Warm-toned LED lights can soften color appearances, while cool-toned fluorescent lighting might create a starker contrast between tile and grout. Rooms with multiple light sources, such as kitchens or bathrooms, require extra consideration. Take photographs of your tile and grout samples under different lighting conditions to create a visual record that allows for objective comparison.
To verify the success of your lighting evaluation, create a systematic approach. Take detailed notes documenting how different light sources affect the interaction between tile and grout colors. Look for consistency in color appearance and identify any unexpected shifts or variations. The goal is to select a grout color that maintains its intended aesthetic appeal across various lighting conditions, ensuring your design remains visually harmonious from dawn to dusk. Trust your observations and be prepared to make subtle adjustments to accommodate the unique lighting characteristics of your specific space.
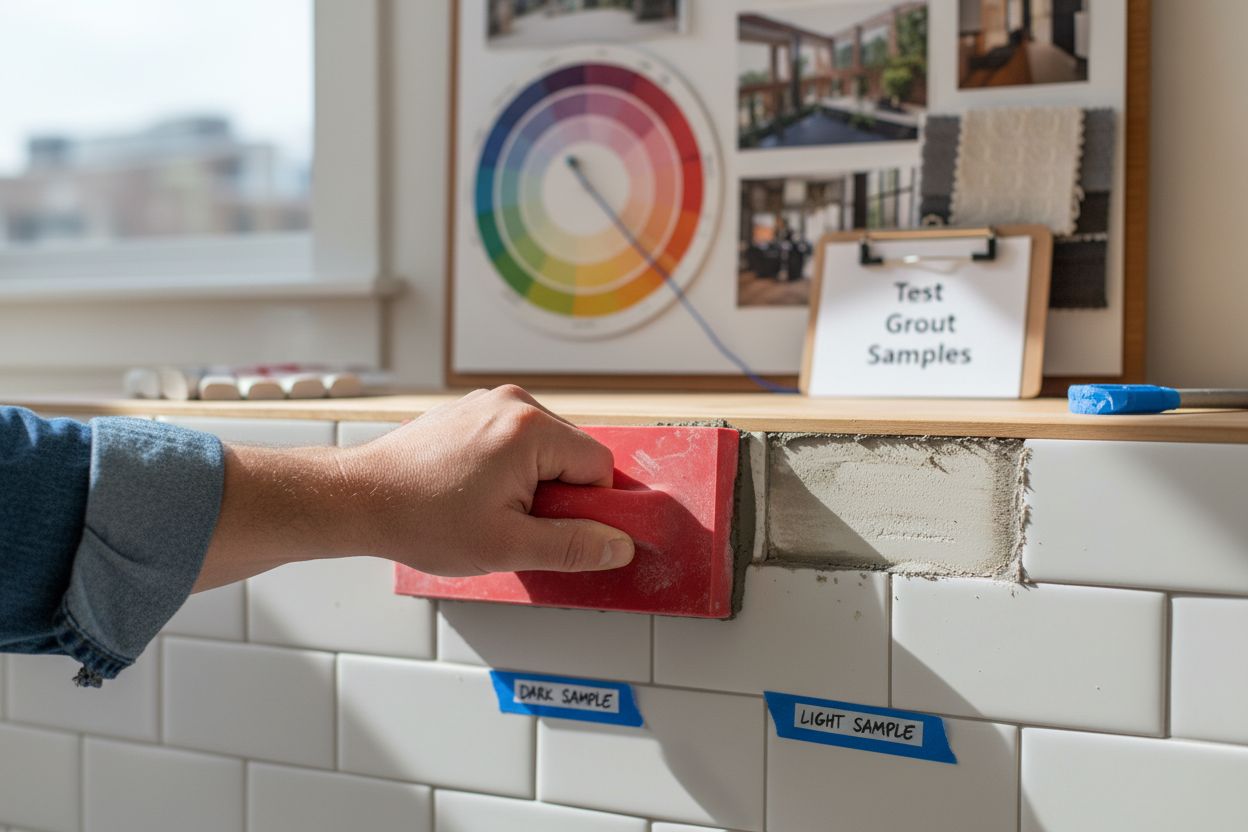
Step 4: Test Grout Samples on Site
Testing grout samples directly in your project space is the most reliable method for ensuring your color selection will achieve the desired aesthetic and functional results. This critical step transforms theoretical color selection into a practical, visual assessment that eliminates guesswork and potential disappointment. Preparing and applying grout samples requires patience, attention to detail, and a systematic approach to evaluation.
Begin by creating small test areas using your selected tile and potential grout color combinations. Purchase sample quantities of grout in your top color choices and prepare a dedicated testing section that represents a representative area of your full project. This might involve creating a small patch on a less visible section of your wall or floor, or using a spare piece of tile board that mimics your actual installation surface. Learn more about grout maintenance and care to understand long-term performance considerations.
Apply the grout samples using the same tools and techniques you would use for the full installation. Use a standard grout float and ensure consistent application techniques to create an accurate representation of the final result. Allow the sample areas to dry completely, which typically takes 24 to 48 hours, paying close attention to how the color settles and integrates with your tile.
 Different grout formulations and application methods can subtly alter the final appearance, so precision during this testing phase is crucial.
Evaluate your test samples under multiple lighting conditions and from various angles. Observe how the grout color performs throughout different times of day, considering natural sunlight, artificial lighting, and evening ambient light. Take photographs of the samples to create a visual record and allow for objective comparison. Look for consistency in color, how well the grout complements the tile, and whether it enhances or detracts from the overall design aesthetic.
To verify the success of your grout sample testing, establish clear evaluation criteria. Check for color uniformity, ease of application, how well the grout fills tile joints, and its visual harmony with surrounding design elements. The ideal grout sample should look intentional, create visual balance, and meet both your aesthetic preferences and practical performance requirements. Don’t rush this process; give yourself time to live with the samples and observe how they integrate into your space over several days. Trust your visual assessment and be willing to make adjustments if the initial samples do not meet your expectations.

Step 5: Finalize Grout Color Choice
Finalizing your grout color is the culmination of a thoughtful, strategic selection process that balances aesthetic preferences with practical considerations. This critical decision represents the final step in transforming your tile installation from a mere construction project to a cohesive design statement. The selection you make now will impact the visual harmony and long-term performance of your space for years to come. Explore our comprehensive grout selection guide to ensure you make the most informed decision possible.
Review all the information gathered throughout your selection journey, synthesizing insights from tile characteristics, design theme, lighting conditions, and sample testing. Reflect on how each potential grout color interacts with your specific environment. Consider not just the immediate visual impact, but how the color will age and perform over time. A truly successful grout color should maintain its aesthetic appeal while offering practical durability in high-traffic or moisture-prone areas.
Take a holistic approach to your final selection by creating a comprehensive evaluation matrix. Compare your top grout color choices across multiple criteria, including visual harmony with tiles, compatibility with the room’s design theme, performance in different lighting conditions, and potential maintenance requirements. Consider the psychological impact of color – lighter grouts can make spaces feel more open and airy, while darker grouts can add depth and drama to your design. Pay special attention to how the grout color interacts with your tile’s texture, ensuring it enhances rather than competes with the tile’s inherent characteristics.
Verify your final choice through a systematic validation process. Revisit your on-site samples multiple times over several days, observing them under different lighting conditions and from various angles. Consult with design professionals or trusted friends who can provide objective feedback. Take high-quality photographs of your samples and review them digitally, which can sometimes reveal nuances that might be less apparent in person. The ultimate test is whether the grout color creates a sense of visual harmony and meets both your aesthetic vision and practical requirements.
Make your final selection with confidence, understanding that you’ve approached this decision methodically. Trust your careful research and intuition, knowing that the perfect grout color will not only enhance your tile installation but also contribute to the overall design narrative of your space.
The following table summarizes the main steps for selecting a grout color, along with the key actions and what to look for at each stage.
| Step | Key Actions | What to Look For |
|---|---|---|
| 1. Assess Tile Color and Texture | Examine color, texture, and tile samples in your space | Identify dominant tones; check how tile and grout interact |
| 2. Consider Design Theme | Evaluate room style and permanent fixtures | Grout color should complement walls, cabinets, counters |
| 3. Evaluate Lighting Conditions | Observe samples under different lighting | Note any color shifts throughout the day |
| 4. Test Grout Samples On Site | Apply test patches and let dry 24-48 hours | See how grout looks with tile in real conditions |
| 5. Finalize Grout Color Choice | Compare options, revisit samples, consult others | Choose option with best harmony and durability |
| Remember that this choice is more than just a technical detail – it’s an integral part of creating a cohesive, beautiful environment that reflects your personal style and design sensibilities. |
Find the Perfect Grout and Tile Match for Your Dream Space
Struggling to achieve a cohesive look and confident finish for your tile project? Choosing the right grout color can feel overwhelming, especially when you want every detail to support your vision. The article you just explored explains how natural light, tile texture, and design themes all play a role in making this important decision. If you are worried about clashing tones, selecting the wrong finish, or simply want to see all your color options in one place, BELK Tile offers an easy path forward.
With BELK Tile, you can browse a vast selection of high-quality tiles designed for kitchens, bathrooms, outdoor spaces, and every other nook of your home. Each product listing features detailed specifications and images to help you imagine how different combinations will look in your space. Inspired to test your knowledge? Visit our main site to discover the latest tile options and visual tools that allow you to experiment with color pairings before you buy. Start your project with confidence—shop now to take advantage of exclusive offers and unlock expert solutions for every design challenge.
Frequently Asked Questions
How do I assess my tile color and texture before selecting grout?
To assess your tile color and texture, gather your tile samples and examine them under different lighting conditions in the actual space. Focus on the tile’s primary colors and textures to determine a grout color that complements or contrasts effectively.
What should I consider regarding the overall design theme when selecting grout color?
Consider the existing colors in your space, such as walls and countertops, to ensure that your grout color complements these elements. Aim for a grout color that enhances the design theme of the room, whether that be a minimalist or rustic style.
How do different lighting conditions affect my grout color selection?
Lighting can dramatically change how grout color appears next to tile. Evaluate your tile and grout samples in both natural and artificial light at various times of day to understand how they interact with each type of illumination.
What is the best way to test grout samples on-site?
Create small test patches using your chosen grout color next to your tile to visualize how they work together. Apply the grout as you would for a full installation, allow it to dry, and observe it over several days to assess its look under different lighting conditions.
How can I finalize my grout color choice confidently?
To finalize your grout color, review your assessments from tile characteristics, design themes, and lighting evaluations. Create an evaluation matrix to compare your top choices based on visual harmony and maintenance considerations, ensuring it meets your long-term practical needs.
Recommended


