How to Seal Tile Grout: A Step-by-Step Guide
Posted by Mike Belk on Oct 15, 2025

Sealing tile grout might look simple at first glance. People often skip steps or rush through the process expecting quick results, but there is one fact that changes everything. Moisture left in grout can ruin an entire sealing job and lead to mold and sealant failure. Cleaning and letting grout dry completely is not just busywork. It is the key to having tile that resists stains and damage for years with almost no extra effort.
Table of Contents
- Step 1: Prepare The Area By Cleaning The Grout
- Step 2: Allow The Grout To Dry Completely
- Step 3: Select The Appropriate Grout Sealer
- Step 4: Apply The Grout Sealer Evenly
- Step 5: Wipe Away Excess Sealer
- Step 6: Test The Sealer For Effectiveness
Quick Summary
| Key Point | Explanation |
|---|---|
| 1. Clean grout thoroughly before sealing | Remove dirt and debris to ensure effective sealant adherence and maximum protection against stains and moisture. |
| 2. Allow grout to dry completely | Ensure grout is completely dry for 24 to 48 hours to prevent trapping moisture that can lead to mold or sealant failure. |
| 3. Choose the right grout sealer | Select a sealer based on tile type and location for optimal moisture resistance and stain protection. |
| 4. Apply sealer evenly | Use proper tools and techniques to cover grout lines thoroughly while avoiding excess buildup that may lead to an uneven finish. |
| 5. Test sealer effectiveness after application | Conduct a simple water droplet test after curing to confirm proper sealing; beads of water indicate successful protection. |
Step 1: Prepare the Area by Cleaning the Grout
Cleaning your tile grout thoroughly before sealing is a critical first step that determines the success of your entire sealing project. Proper preparation ensures the sealant adheres correctly and provides maximum protection against moisture and staining. The key is removing all dirt, debris, and existing grime from between your tiles to create a clean surface ready for sealing.
Begin by gathering the right cleaning supplies. You will need a stiff bristle brush, neutral pH tile cleaner, clean white cloths, a bucket of warm water, and protective gloves. Choose a tile cleaner specifically designed for your tile type to avoid potential surface damage. For most ceramic and porcelain tiles, a mild alkaline cleaner works effectively without causing discoloration or etching.
Apply the tile cleaner generously across the grout lines, allowing it to sit for several minutes to break down embedded dirt and stains. Use your stiff bristle brush to scrub the grout lines systematically, working in small sections and applying consistent pressure. The scrubbing motion helps dislodge stubborn dirt trapped within the grout’s porous surface. Work methodically from one side of the tiled area to the other, ensuring you cover every grout line completely.
After thorough scrubbing, rinse the area with clean warm water, using a separate cloth or sponge to remove all cleaning solution residue. Proper rinsing is crucial to prevent any remaining cleaning chemicals from interfering with the grout sealing process. Allow the grout and tiles to dry completely for at least 24 hours before proceeding to the sealing stage. You can read more about tile and grout maintenance to understand the long-term care of your tiled surfaces.
Check the grout lines carefully after cleaning. Look for any signs of damage, cracking, or areas that might need repair before sealing. If you notice significant grout deterioration, you might need to address those sections first to ensure a smooth, uniform sealing process. A clean, solid grout foundation is essential for effective protection and a professional-looking finish.
Here is a handy tools and materials checklist table summarizing what you need for cleaning and sealing grout, plus the purpose of each item.
| Tool/Material | Purpose |
|---|---|
| Stiff bristle brush | Scrub and clean grout lines thoroughly |
| Neutral pH tile cleaner | Clean dirt and grime; safe for most tile types |
| Clean white cloths/sponges | Rinse away cleaner residue; wipe excess sealer |
| Bucket with warm water | Rinsing tiles and grout during cleaning process |
| Protective gloves | Protect hands from chemicals during cleaning/sealing |
| Grout sealer (chosen type) | Seal and protect grout from moisture and stains |
| Foam brush/applicator | Apply grout sealer evenly along grout lines |
| Fan/dehumidifier (optional) | Speed up grout drying, especially in humid areas |
Step 2: Allow the Grout to Dry Completely
After thoroughly cleaning your tile grout, the critical next step is ensuring complete and thorough drying. Moisture is the enemy of effective grout sealing, and any residual dampness can significantly compromise the sealing process and the long-term performance of your grout protection. This step requires patience and careful attention to create the ideal conditions for successful sealing.
The drying process typically takes between 24 to 48 hours, depending on environmental conditions such as humidity, temperature, and ventilation. Warm, dry environments with good air circulation will accelerate drying time, while cool, humid spaces will extend the process. Open windows, use fans, and consider using a dehumidifier to create optimal drying conditions. Avoid rushing this step, as premature sealing can trap moisture and lead to potential mold growth or sealant failure.
To verify the grout is completely dry, conduct a simple moisture assessment. Touch the grout lines gently with a clean white cloth or paper towel. If any discoloration or moisture appears on the cloth, the grout needs more time to dry. Another method is to visually inspect the grout lines looking for any dark or damp areas. The grout should appear uniformly light in color and feel completely dry to the touch. Patience during this stage is crucial for achieving a professional and long-lasting seal.
If you are working in an area with limited ventilation or high humidity, you might need to extend the drying time. Bathrooms, laundry rooms, and basement areas often require extra attention. Check out our guide on tile maintenance for additional tips on managing moisture in tiled spaces. Professional tile installers recommend waiting at least 48 hours in challenging environments to ensure absolute dryness before applying any sealant.
Once you are confident the grout is completely dry, you can move forward to the next step of the sealing process. Remember, thorough drying is not just a recommendation but a critical requirement for effective grout sealing. Taking the time to ensure proper drying will protect your investment and maintain the beauty of your tiled surfaces for years to come.
Step 3: Select the Appropriate Grout Sealer
Choosing the right grout sealer is a critical decision that directly impacts the longevity and protection of your tile installation. Different tile types and locations require specific sealing solutions, making this selection process more nuanced than simply picking the first product you find. The primary goal is to select a sealer that provides optimal protection while maintaining the aesthetic qualities of your specific tile and grout.
There are two primary categories of grout sealers: penetrating sealers and membrane-forming sealers. Penetrating sealers absorb into the grout, creating an invisible protective barrier that resists moisture and stains without changing the grout’s appearance. These work exceptionally well for natural stone tiles and areas with high moisture exposure like shower walls and kitchen backsplashes. Membrane-forming sealers, by contrast, create a protective layer on top of the grout, which can alter the grout’s color and provide a glossy or matte finish. They are often used in decorative applications where visual enhancement is as important as protection.
Consider the specific environment and tile type when making your selection. Ceramic and porcelain tiles in low-moisture areas might require a different sealer compared to natural stone tiles in high-humidity spaces. Water-based sealers are typically easier to apply and have lower odor, while solvent-based sealers penetrate more deeply and offer longer-lasting protection. Learn more about tile sealer types and their functions to make an informed decision.
When purchasing a grout sealer, carefully read the product specifications. Look for sealers that offer protection against water, oil, and other potential staining agents. Some advanced sealers provide additional benefits like mold and mildew resistance, which can be crucial in bathrooms and kitchens. Professional-grade sealers might cost more upfront but often provide superior long-term protection and require less frequent reapplication.
Below is a comparison table of common types of grout sealers and their main applications, features, and considerations to help you select the right one for your project.
| Sealer Type | Main Applications | Features & Benefits | Considerations |
|---|---|---|---|
| Penetrating Sealer | Natural stone, high-moisture areas | Absorbs into grout; invisible finish; resists moisture and stains | Does not change grout appearance |
| Membrane-Forming Sealer | Decorative applications, low moisture | Forms a protective layer on surface; can provide glossy or matte look | May alter grout color/finish |
| Water-Based Sealer | General tile surfaces, easy projects | Low odor; easy application; dries quickly | May require more frequent reapplication |
| Solvent-Based Sealer | Areas needing heavy-duty protection | Deep penetration; longer-lasting protection | Strong odor; may be harder to apply |
Before making a final purchase, test the sealer on a small, inconspicuous area to ensure compatibility with your specific tile and grout. Some sealers can cause discoloration or unwanted changes in texture, so a patch test is always recommended. By taking the time to select the right grout sealer, you are investing in the beauty and durability of your tiled surfaces.
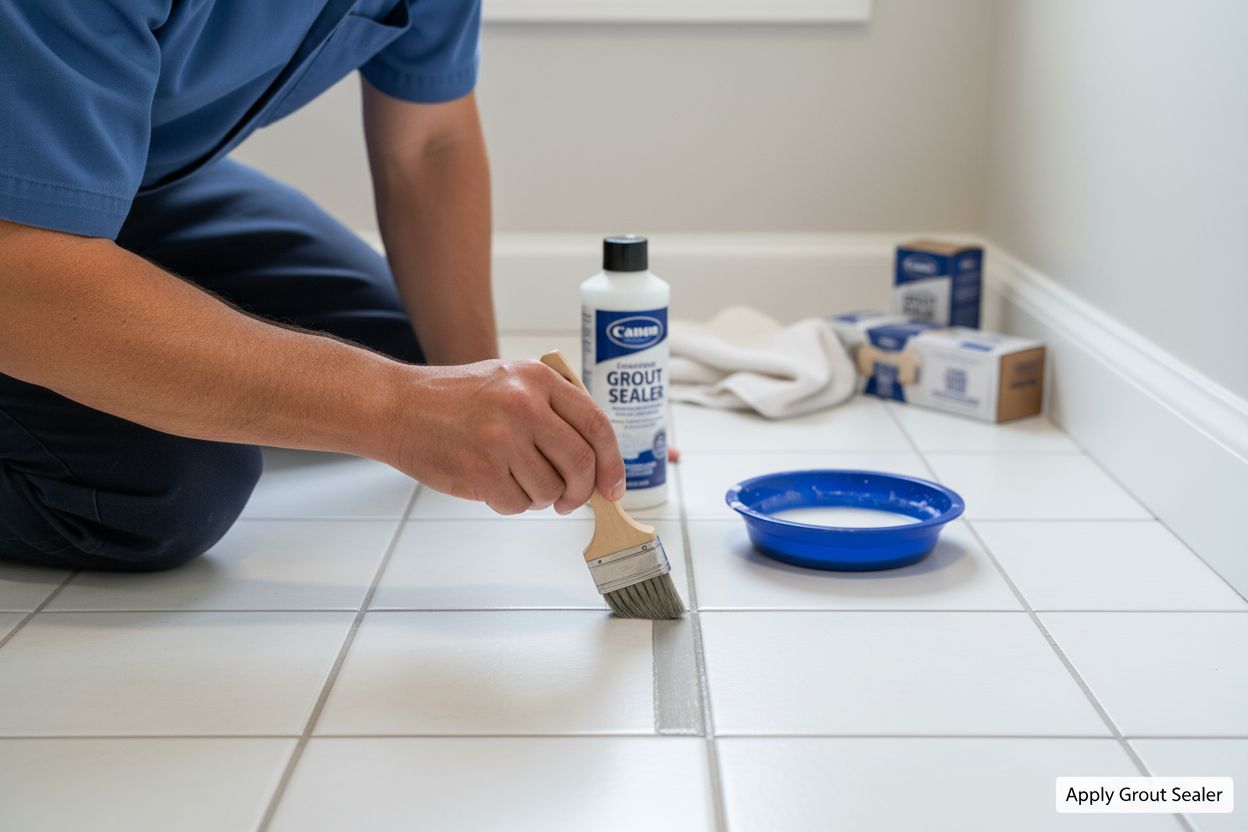
Step 4: Apply the Grout Sealer Evenly
Applying grout sealer requires precision, patience, and a methodical approach to ensure complete and uniform protection. The goal is to cover every grout line thoroughly without creating excess buildup or leaving any gaps that could compromise the sealing process. Your technique will determine the effectiveness and longevity of the grout protection.
Begin by gathering the right application tools. Depending on your chosen sealer, you might use a small foam brush, a specialized grout sealer applicator, or a narrow paintbrush with soft bristles. These tools allow for controlled, precise application directly into the grout lines. Pour a small amount of sealer into a clean, shallow container to prevent contamination of the entire bottle and make the application process more manageable.
Work systematically across your tiled surface, applying the sealer in small sections to maintain control and ensure even coverage. Start in a corner or less visible area to practice your technique and get comfortable with the application process. Apply the sealer carefully along the grout lines, using gentle, consistent pressure to push the product into the grout’s porous surface. Avoid oversaturating the grout, which can lead to excess product pooling or uneven absorption. Most professional-grade sealers recommend applying two thin coats rather than one thick coat for optimal protection.
Learn more about natural stone tile maintenance to understand the nuanced requirements of different tile types. After applying the sealer, use a clean, dry cloth to immediately wipe away any excess product from the tile surfaces. This prevents potential staining and ensures a clean, professional finish. Some sealers require a specific waiting time between coats, so carefully follow the manufacturer’s instructions regarding application and drying times.
To verify complete and even coverage, wait for the recommended drying time and then inspect the grout lines carefully under good lighting. The sealed grout should appear uniformly colored and slightly more resistant to water. If you notice any missed spots or uneven application, you can typically touch up those areas with a second careful application. Patience and attention to detail during this step will provide long-lasting protection for your tile installation.
Step 5: Wipe Away Excess Sealer
Removing excess sealer is a crucial step that prevents potential staining, discoloration, and an uneven surface finish. Even the most carefully applied sealer can leave residue on tile surfaces, which if left untreated, can create a cloudy, unattractive appearance that diminishes the overall aesthetic of your tiled area. This step requires a delicate touch and careful attention to detail.
Immediately after applying the sealer, begin the cleanup process using clean, soft, white cloths or lint-free paper towels. Work quickly but methodically, wiping the tile surfaces in a gentle, circular motion to remove any sealer that has accidentally spread beyond the grout lines. The key is to remove the excess product while it is still wet, which makes the cleanup process significantly easier and more effective. Pay special attention to textured tiles or natural stone surfaces, where sealer can easily settle into microscopic crevices.
For penetrating sealers, you typically have a short window of 5 to 10 minutes after application to remove excess product. Membrane-forming sealers might require slightly different timing, so always refer to the specific manufacturer’s instructions. Use multiple clean cloths during the wiping process, rotating to a fresh section of the cloth frequently to prevent redepositing the excess sealer onto the tiles. If you notice any stubborn residue, lightly dampen a cloth with the manufacturer’s recommended cleaning solution to help break down the excess sealer without damaging the tile surface.
Check out our comprehensive guide on tile maintenance for additional insights into preserving your tiled surfaces. After the initial wipe-down, allow the sealed surface to dry completely and then perform a final inspection under good lighting. Look for any remaining hazy spots or residue on the tiles. If you discover any lingering sealer, you can typically remove it using a clean, dry cloth or a specialized sealer haze remover recommended by the product manufacturer.
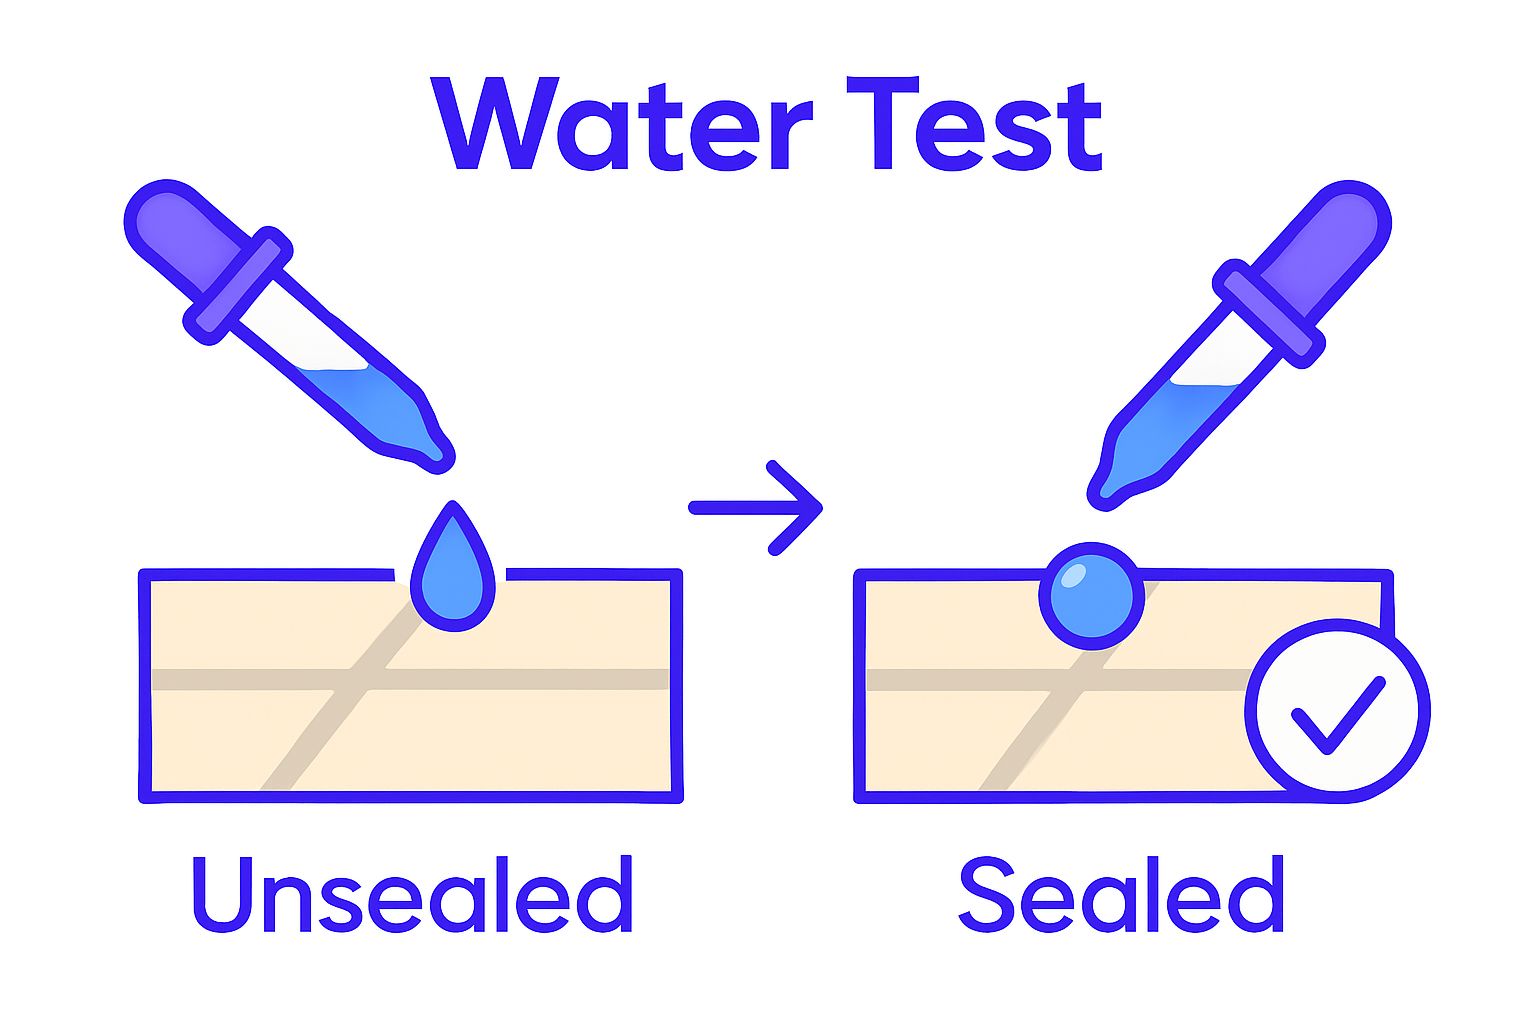
The final test of your successful sealer application is a water droplet test. After the recommended curing time, sprinkle a few drops of water on the sealed grout. If the water beads up and does not immediately absorb into the grout, you have successfully sealed and protected your tile surface.
 This simple verification ensures that your hard work has created a protective barrier against moisture, stains, and potential damage.
Step 6: Test the Sealer for Effectiveness
Testing the effectiveness of your newly applied grout sealer is the final and crucial step that confirms your hard work has successfully protected your tile installation. This verification process goes beyond visual inspection, providing tangible proof of the sealer’s performance and your protection against moisture, stains, and potential damage.
Wait the recommended curing time specified by the manufacturer before conducting your effectiveness test. This waiting period allows the sealer to fully penetrate and bond with the grout, ensuring accurate results. Typically, this curing time ranges from 24 to 72 hours, depending on the specific product and environmental conditions. During this period, avoid cleaning the tiled surface or exposing it to excessive moisture to allow the sealer to set properly.
The primary testing method involves a simple water droplet test. Select several different areas of your sealed grout, preferably in locations with varying exposure and wear patterns. Carefully drop small amounts of water directly onto the grout lines and observe how the liquid interacts with the surface. According to professional home maintenance guidelines, a properly sealed grout will cause water to bead up and sit on the surface without immediately absorbing. If the water droplets are quickly absorbed or the grout appears to darken significantly, this indicates that the sealing process may need to be repeated.
For a comprehensive assessment, conduct additional tests using different liquids that might typically cause staining. A few drops of colored liquids like red wine, coffee, or cooking oil can help demonstrate the sealer’s stain-resistance capabilities. Place these test droplets on different grout sections and monitor how they interact over several minutes. Observe whether the liquids sit on the surface or begin to penetrate, which will give you a clear indication of the sealer’s protective qualities.
If your tests reveal incomplete coverage or absorption, do not be discouraged. Many professional tile installers recommend applying a second coat of sealer to ensure maximum protection. Allow the surface to dry completely between applications, and repeat the testing process to confirm improved performance. By taking the time to thoroughly test your grout sealer, you are investing in the long-term beauty and durability of your tiled surfaces.
Secure Long-Lasting Beauty for Every Tile Project
After learning exactly how to seal tile grout step by step, you know that proper preparation, careful product choice, and expert technique are key to lasting results. But even when you master this process, success starts with the right foundation. Is your tile as striking and dependable as your newly sealed grout deserves? Discover a range of premium options that transform your space and make every maintenance step more rewarding.
Give your home or business a fresh, enduring finish by choosing from BELK Tile’s extensive collections. Enjoy styles for every taste, from classic subway shapes to modern mosaics. With expert guides and detailed product specs, you will find everything you need to keep your tile and grout looking outstanding. Make your next project easier and more beautiful—visit https://www.belktile.com and start your upgrade today.
Frequently Asked Questions
How do I clean tile grout before sealing?
To clean tile grout before sealing, use a stiff bristle brush and a neutral pH tile cleaner. Apply the cleaner generously on the grout lines, let it sit for several minutes, and scrub thoroughly in small sections before rinsing with warm water.
How long should I wait for grout to dry before sealing?
It’s crucial to allow the grout to dry completely before sealing, which typically takes 24 to 48 hours. Ensure that the grout feels dry and uniformly light in color by performing a moisture assessment with a clean cloth before proceeding to the sealing step.
What type of grout sealer should I use?
Select a grout sealer based on your tile type and the environment. For high-moisture areas, a penetrating sealer is recommended, while for decorative applications, consider a membrane-forming sealer that can enhance visuals without altering the grout significantly.
How do I apply grout sealer evenly?
To apply grout sealer evenly, use a small foam brush or a specialized applicator to cover the grout lines. Work in small sections, applying thin coats and moving from one corner to the other, ensuring you avoid oversaturation to prevent buildup and uneven absorption.
How do I remove excess sealer from tile surfaces?
Immediately after applying the sealer, use clean, soft cloths to gently wipe away any excess product from the tile surfaces. Work quickly in a circular motion to prevent the sealer from settling into the tile’s surface, focusing especially on textured areas.
How can I test if my grout sealer is effective?
After the manufacturer’s recommended curing time, conduct a water droplet test by placing small amounts of water on the sealed grout. If the water forms beads and does not absorb quickly, your sealing process is effective; if it absorbs, consider reapplying the sealer.
Recommended


