How to Seal Tile Floors for Maximum Longevity
Posted by Mike Belk on Oct 10, 2025

Sealing your tile floors sounds straightforward, but a single missed step can ruin the whole project. Professional installers warn that tiles left unsealed can soak up stains in seconds and lose years off their lifespan. Most people rush the process or choose the wrong product, yet the real secret is all in the details before you ever touch a brush. Here is where most homeowners trip up.
Table of Contents
- Step 1: Prepare The Tile Surface Thoroughly
- Step 2: Choose An Appropriate Sealer
- Step 3: Apply The Tile Sealer Evenly
- Step 4: Allow The Sealer To Cure Properly
- Step 5: Inspect The Sealed Surface For Completeness
Quick Summary
| Key Point | Explanation |
|---|---|
| 1. Thoroughly clean tile surfaces | Use a professional tile cleaner to remove all dirt, ensuring proper sealant adhesion. Residues from household cleaners can hinder sealing effectiveness. |
| 2. Choose the right type of sealer | Select a sealer based on tile material and location to ensure optimal protection. Different tiles require different sealant solutions. |
| 3. Apply sealer evenly | Use consistent strokes and apply thin coats for uniform coverage. Multiple thin layers provide better protection than one thick application. |
| 4. Allow sufficient curing time | Maintain consistency in temperature and humidity for 24-48 hours post-application to ensure sealer bonds properly to tiles. |
| 5. Inspect the sealed surface thoroughly | Check for even coverage and water repellency to confirm sealing effectiveness. Look for any missed spots or imperfections. |
Step 1: Prepare the Tile Surface Thoroughly
Successfully sealing tile floors begins with meticulous surface preparation. This crucial initial step determines the effectiveness and longevity of your tile sealing project. Without proper preparation, even the highest quality sealant will fail to provide the protection your tiles need.
Begin by thoroughly cleaning the tile surface to remove any dirt, grime, or residual substances that could interfere with the sealing process. Use a professional-grade tile cleaner specifically designed to remove stubborn dirt without damaging the tile surface. Avoid household cleaners that might leave behind residues or film that could prevent the sealant from properly adhering.
Cleaning Tools and Supplies:
- Soft-bristled scrub brush
- Professional tile cleaner
- Microfiber cloths
- Bucket of clean water
- Protective rubber gloves
Carefully inspect the tile surface for any existing damage, cracks, or chips that might compromise the sealing process. Small imperfections can trap moisture and create potential long-term issues. If you discover significant damage, consider repairing tiles before proceeding with the sealing process.
After cleaning, allow the tile surface to dry completely. Use fans or open windows to ensure thorough drying, which typically takes 24 to 48 hours depending on humidity levels. Moisture trapped beneath the sealant can lead to ineffective protection and potential tile damage. A completely dry surface ensures optimal sealant absorption and performance.
Here is a table summarizing essential tools and their purposes for the tile cleaning and preparation process, ensuring you have everything ready for an effective start.
| Tool/Supply | Purpose |
|---|---|
| Soft-bristled scrub brush | Removes stubborn dirt and grime gently |
| Professional tile cleaner | Cleans thoroughly without residue |
| Microfiber cloths | Wipes tiles clean and dries surfaces |
| Bucket of clean water | Rinses away cleaning solution |
| Protective rubber gloves | Protects your hands from chemicals |
| Fans or open windows | Promotes faster, even drying |
Professional tip: Test the surface readiness by placing a small drop of water on the tile. If the water beads up rather than absorbing quickly, the surface might still retain moisture and require additional drying time. Patience during this preparation stage will significantly enhance the final sealing results.
Once the surface is immaculately clean and thoroughly dry, you are ready to move forward with applying the tile sealant. Proper preparation is the foundation of a successful tile protection strategy that will keep your floors looking pristine for years to come.
Step 2: Choose an Appropriate Sealer
Selecting the right sealer is a critical decision that directly impacts the longevity and appearance of your tile floors. Different tile materials require specific sealing solutions to ensure optimal protection and performance. Understanding the nuanced differences between sealer types will help you make an informed choice that preserves your tile investment.
Penetrating sealers represent an excellent option for unglazed and natural stone tiles. These specialized sealers absorb deep into the tile’s porous structure, creating an invisible protective barrier that resists moisture and staining from within. According to conservation experts at the National Park Service, penetrating sealers provide long-lasting protection without altering the tile’s natural appearance.
Key Considerations for Sealer Selection:
- Tile material type (ceramic, porcelain, natural stone)
- Location of installation (bathroom, kitchen, outdoor area)
- Desired level of sheen or finish
- Frequency of foot traffic
- Exposure to potential staining agents
Surface sealers offer an alternative approach, creating a protective layer on top of the tile. These sealers work exceptionally well for glazed tiles and can enhance the tile’s color and shine. Glossy surface sealers provide a polished look, while matte finishes maintain a more natural appearance. Professional tile installers recommend carefully matching the sealer to your specific tile type and aesthetic preferences.
When evaluating sealers, pay close attention to the product’s compatibility with your specific tile material. Ceramic and porcelain tiles have different sealing requirements compared to natural stone like marble or travertine. Some tiles come pre-sealed from the manufacturer, so verify the existing protection before applying additional sealant.
Consider the environmental conditions and intended use of the tiled area. High-moisture environments like bathrooms and kitchens demand more robust sealing solutions compared to low-traffic areas. Outdoor tiles exposed to weather fluctuations require specialized sealers with enhanced UV and moisture resistance.
Before making a final selection, purchase small quantities of potential sealers and conduct a patch test in an inconspicuous area.
Below is a concise comparison table of different types of tile sealers, helping you quickly match the most suitable product to your tile type and project location.
| Sealer Type | Best For | Appearance Impact | Key Benefits |
|---|---|---|---|
| Penetrating Sealer | Unglazed, natural stone | Invisible/Matte | Deep protection, resists stains |
| Surface Sealer | Glazed tiles | Glossy or matte | Enhances color, surface protection |
| Glossy Surface Sealer | Glazed ceramic/porcelain | Shiny finish | Highlights color, easy cleaning |
| Matte Surface Sealer | Natural stone/porcelain | Satin/low-sheen | Maintains natural look, non-skid |
| UV-Resistant Sealer | Outdoor tile, patios | Varies (matte/glossy) | Protects from sun/weather exposure |
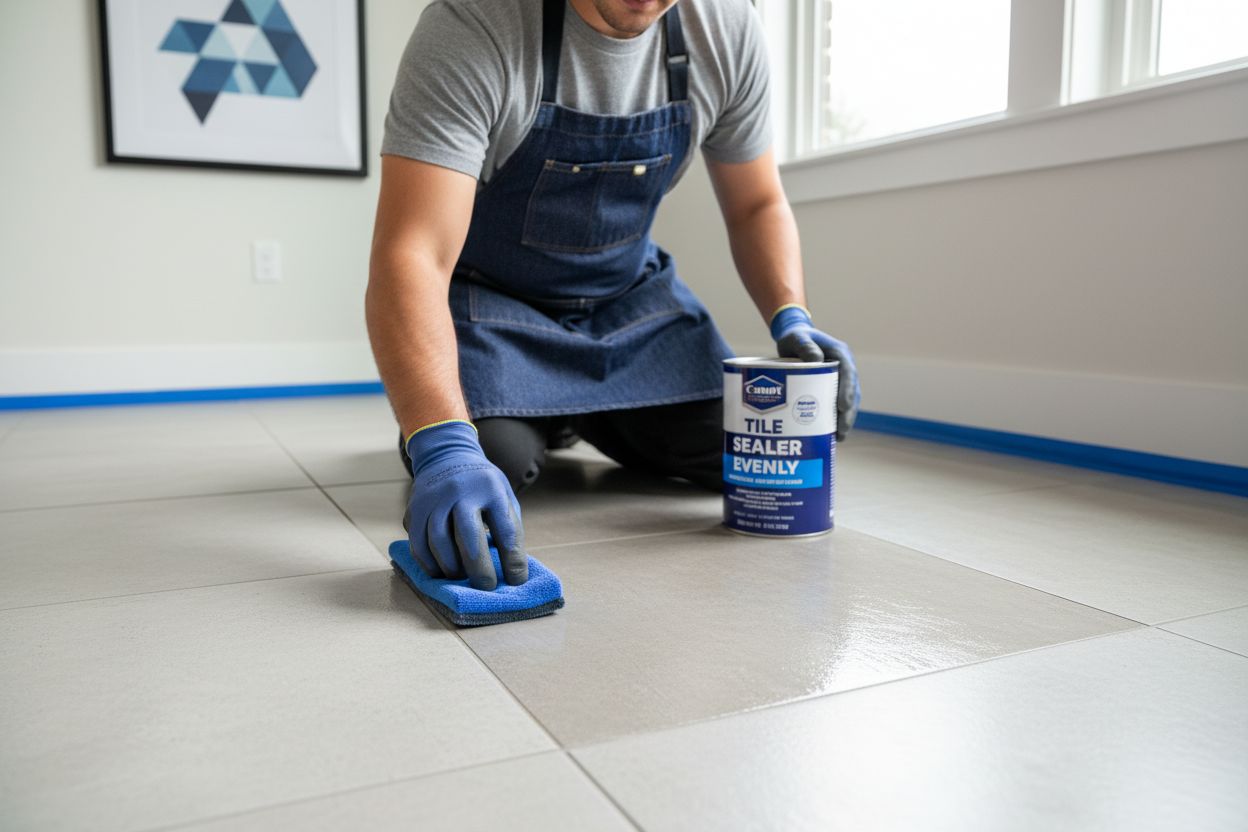
Step 3: Apply the Tile Sealer Evenly
Applying tile sealer requires precision, patience, and a systematic approach to ensure complete and uniform coverage. The application process is where your careful preparation and sealer selection truly come to life. Understanding the nuanced techniques will help you achieve a professional-grade finish that protects your tiles effectively.
Begin by gathering all necessary tools and materials before starting the application. You will need clean microfiber applicator pads, disposable gloves, painter’s tape, and the sealer you selected in the previous step. Learn more about tile sealer fundamentals to enhance your understanding of the process.
Essential Application Tools:
- Microfiber applicator pad or foam roller
- Clean lint-free cloths
- Painter’s tape
- Protective gloves
- Ventilated workspace
Start by protecting adjacent surfaces with painter’s tape. This prevents accidental sealer application on baseboards, walls, or other surfaces. Work in small, manageable sections to maintain control and ensure even coverage. Pour a small amount of sealer into a paint tray and use your microfiber applicator pad or foam roller to apply a thin, consistent layer.
Apply the sealer using long, smooth strokes in a single direction. Avoid oversaturating the surface, which can lead to pooling and uneven absorption. Most sealers require two thin coats rather than one thick application. Allow the first coat to dry completely according to the manufacturer’s recommended time frame, which typically ranges between 15 to 30 minutes.
After the first coat dries, inspect the surface carefully. Look for any missed spots or areas with uneven coverage. Apply the second coat using the same methodical approach, ensuring complete and uniform protection. Some penetrating sealers might require additional coats for maximum effectiveness.
Careful attention to detail during application prevents common mistakes like over-application or missed areas. Move systematically across the tile surface, maintaining a steady hand and consistent pressure.
 For larger areas, work in a grid-like pattern to track your progress and ensure no sections are overlooked.
Verify the sealer’s effectiveness by performing a water droplet test after the final coat has completely dried. Properly sealed tiles will cause water to bead up and sit on the surface rather than immediately absorbing. This simple test confirms the success of your sealing process and provides immediate visual confirmation of your hard work.
Step 4: Allow the Sealer to Cure Properly
Curing represents the critical final phase of your tile sealing project, where patience becomes your most valuable tool. This stage transforms the applied sealer from a liquid coating into a robust protective barrier that will safeguard your tiles against moisture, stains, and daily wear. Understanding the nuanced requirements of the curing process ensures maximum effectiveness and longevity of your sealing effort.
Immediately after application, create an optimal environment for sealer curing. This means maintaining consistent temperature and humidity levels while preventing any foot traffic or contact with the sealed surface. Most professional sealers require a minimum of 24 to 48 hours of undisturbed curing time, though specific durations can vary depending on the product and environmental conditions.
Critical Curing Environment Factors:
- Maintain room temperature between 60-75 degrees Fahrenheit
- Ensure low humidity levels
- Minimize air movement from fans or air conditioning
- Prevent any direct contact with the sealed surface
- Keep pets and children away from the area
Ventilation plays a significant role during the curing process. While you want to minimize direct airflow, ensure the space remains well-ventilated to help the sealer set properly. According to preservation experts, proper air circulation supports optimal chemical bonding without disrupting the sealer’s molecular structure.
Temperature control is paramount during curing. Extreme heat or cold can compromise the sealer’s ability to bond correctly with the tile surface. Avoid sealing tiles in direct sunlight or in spaces with significant temperature fluctuations. If possible, choose a time of year with moderate, consistent temperatures to ensure the most reliable curing conditions.
Resist the temptation to test the sealer’s effectiveness too soon. Walking on the surface, placing furniture, or cleaning the tiles prematurely can interrupt the curing process and potentially damage the newly applied protective layer. Most manufacturers recommend waiting at least 48 to 72 hours before resuming normal activity in the sealed area.
To verify successful curing, perform a simple water droplet test after the recommended curing time. Place a few drops of water on different areas of the sealed tile. If the water beads up uniformly and does not immediately absorb, your sealer has cured correctly. This test provides visual confirmation that your careful preparation and application have created a robust protective barrier for your tile floors.
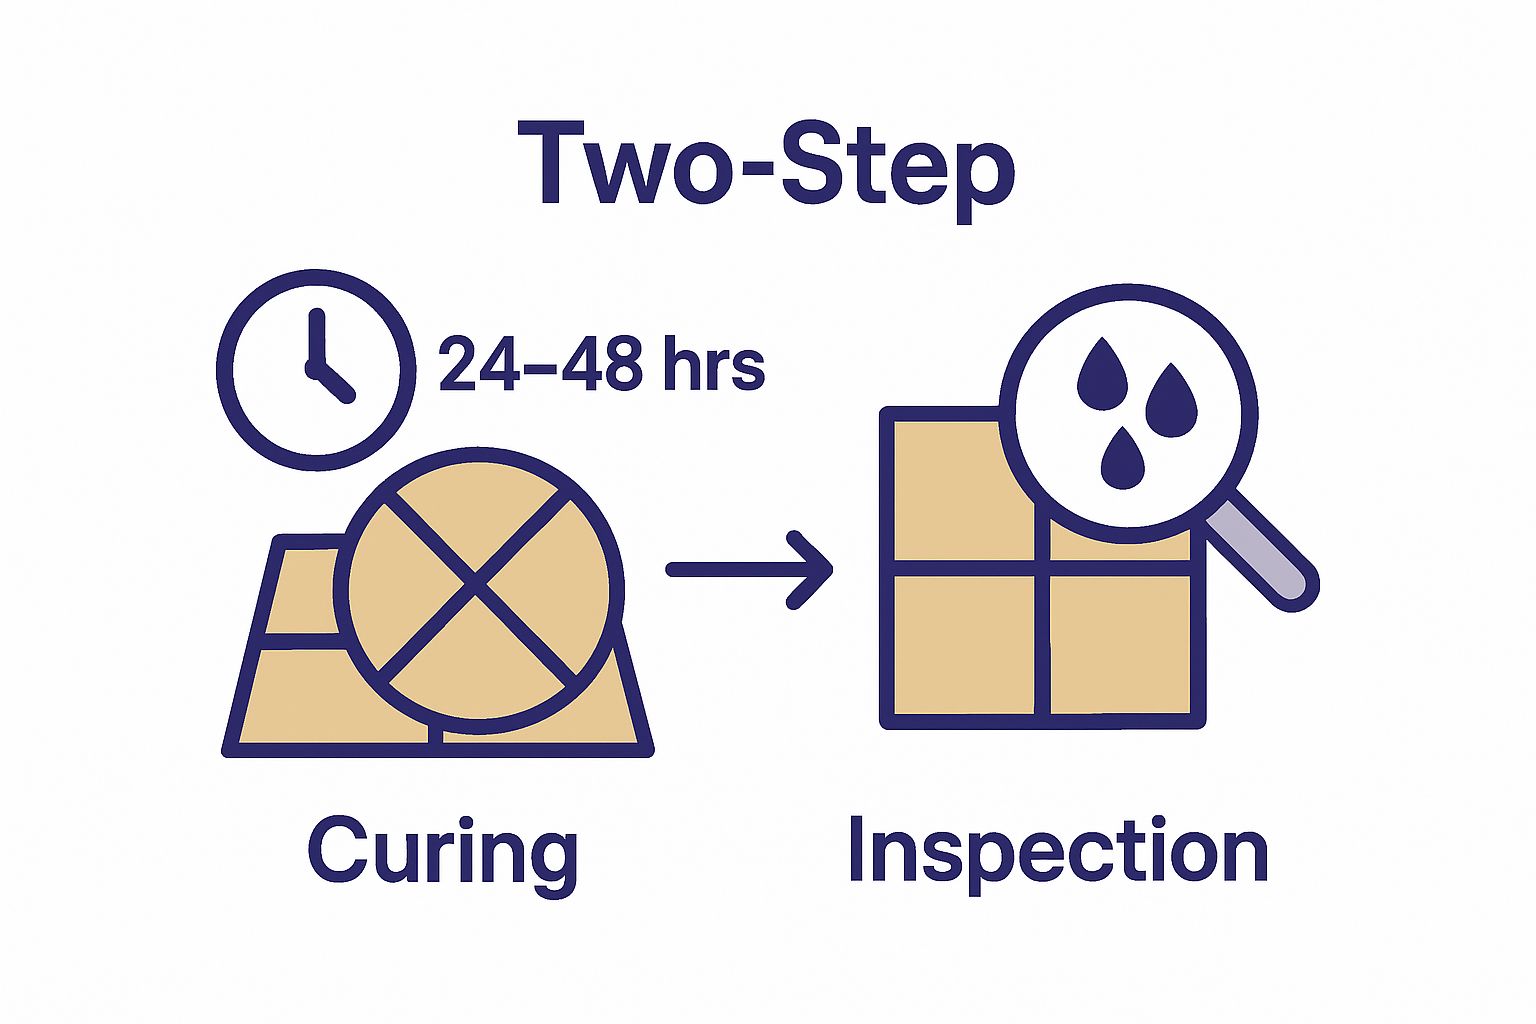
Step 5: Inspect the Sealed Surface for Completeness
Inspecting your newly sealed tile surface represents the final quality control checkpoint in your tile protection journey. This critical step ensures that your meticulous preparation, careful sealer selection, and precise application have resulted in a comprehensive protective layer. A thorough inspection can reveal subtle imperfections that might compromise the long-term performance of your tile floors.
Begin your inspection by creating optimal lighting conditions. Natural daylight or bright, consistent artificial lighting helps expose any uneven sealer application, missed spots, or potential surface irregularities. Learn more about professional tile maintenance techniques to enhance your understanding of surface evaluation.
Key Inspection Criteria:
- Check for uniform color and sheen across the entire surface
- Look for any pooling or uneven sealer distribution
- Verify complete coverage in grout lines and tile edges
- Test surface water repellency
- Examine tiles from multiple angles and lighting conditions
Move systematically across the tiled area, examining the surface from different angles and distances. Crouch down to eye level and scan the tiles, which allows you to detect subtle variations in sealer application that might be invisible from a standing position. Pay special attention to grout lines and tile edges, as these areas are most prone to incomplete coverage.
Perform multiple verification tests to confirm the sealer’s effectiveness. The water droplet test remains the most reliable method for assessing surface protection. Gently drop small water beads on various tile sections and observe their behavior. Properly sealed tiles will display consistent water beading, with droplets maintaining a rounded shape and sitting atop the surface without immediate absorption.
Check for color consistency and potential changes introduced by the sealer. Some sealers can slightly enhance or alter tile appearance, so compare the sealed surface against your original expectations. Look for any unexpected color variations or sheens that might have occurred during the application process.
If you discover any imperfections during your inspection, do not panic. Minor issues can often be addressed by carefully applying an additional thin coat of sealer or consulting the manufacturer’s troubleshooting guidelines. For more significant problems, consider consulting a professional tile maintenance specialist who can provide targeted advice for your specific situation.
A comprehensive inspection not only verifies the success of your sealing project but also provides an opportunity to familiarize yourself with the newly protected surface.
Use this inspection checklist to verify your tile sealing results by evaluating key completion criteria before finalizing your project.
| Inspection Task | What to Look For | Outcome |
|---|---|---|
| Surface Color & Sheen Consistency | Uniform appearance | Even coverage, attractive finish |
| Grout Line & Edge Coverage | No missed spots or gaps | Complete protection |
| Water Droplet Test | Droplets bead up, don’t absorb | Effective sealing confirmed |
| Pooling or Uneven Distribution | No visible excess or streaks | Smooth, consistent surface |
| View from Multiple Angles | No irregularities or dull spots | Professional-quality finish |
Seal in Lasting Beauty with BELK Tile’s Premium Solutions
You’ve learned how proper surface preparation and the right sealing techniques can protect your tile floors for years, but choosing the perfect tile is just as vital for achieving results that you will be proud of. Many homeowners struggle with maintaining long-term durability and flawless style, whether in busy kitchens, elegant bathrooms, or high-traffic commercial spaces. If you want peace of mind that your floor will look beautiful and stay resilient, it starts with selecting top-quality tile that works hand-in-hand with professional sealing strategies.
Now is your chance to upgrade your space with BELK Tile’s wide selection of premium products designed for every style and application. Our full tile collection includes durable options like porcelain, classic ceramic, and stunning natural stone, all crafted for easy maintenance and maximum longevity. Ready to discover tiles that bring your vision to life? Start exploring BELK Tile’s online store today. Make your next renovation last a lifetime with the perfect combination of expert advice and the finest tiles, available now.
Frequently Asked Questions
What is the first step in sealing tile floors?
Successfully sealing tile floors starts with thorough surface preparation, which includes cleaning the tiles and ensuring they are completely dry to ensure proper adhesion of the sealant.
How do I choose the right sealer for my tile type?
Selecting the appropriate sealer depends on the type of tile material (ceramic, porcelain, or natural stone) and the desired finish (glossy or matte). Ensure that the sealer is compatible with the specific tile type for optimal results.
How many coats of tile sealer should I apply?
Most tile sealing projects require at least two thin coats of sealer for effective protection. Always follow the manufacturer’s instructions regarding the drying time between coats.
How can I check if the sealant has cured properly?
To verify if the sealant has cured effectively, perform a water droplet test. If the water beads up and does not absorb into the tile, the sealing process has been successful.
Recommended


