A Complete Guide to removing, replacing and laying tiles
Posted by Mike Belk on May 24, 2021


The tile is probably one of the most robust floor coverings you can install in your apartment or house. Wall tiles also decorate and protect the building fabric from damage. Its history goes back to Roman antiquity, so tiles have a tradition. Anyone who has had enough of their decades-old tile covering or is about to renovate has to remove the tiles. Because ceramic and other tiles are so tough, removal is often a complicated task. Our step-by-step guide shows you how to remove tiles. We will also show you which safety measures you must take and what needs to be considered for underfloor heating. If you are not sure how to do it, it is advisable to consult an expert.
Who can remove tiles?
Do you love tiles, but have little technical talent yourself? The tiler is your handyman of choice when it comes to installing or removing tiles. Regardless of whether you remove the tiles yourself or hire a handyman to do it – we must observe some safety measures before starting work. Removing tiles leads to a lot of dust. Therefore, you should first wear appropriate work clothes yourself. It would be best if you use protective gloves for the removal. After all, depending on the area, you will work for several hours with a hammer, chisel, and grinding machine. It is particularly important to wear protective goggles and a breathing mask to avoid health problems caused by the construction and grinding dust.
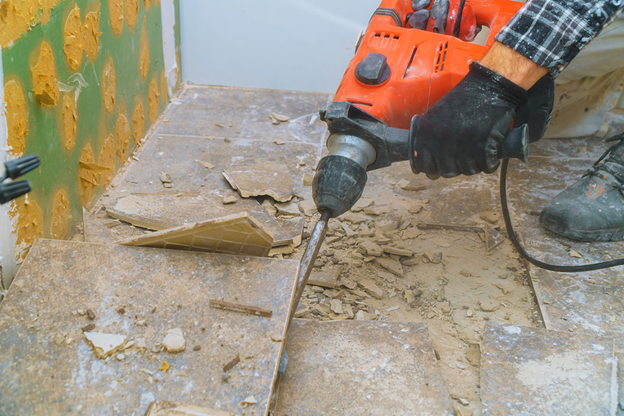
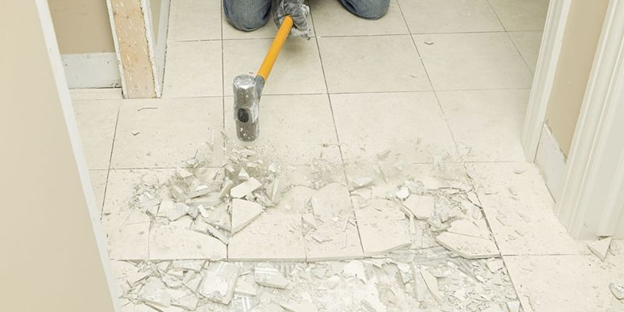
Do you have underfloor heating under the tiles? Then it would help if you were particularly careful when removing tiles. Here it is necessary to place the chisel as flat as possible and avoid using the hammer drill. Even if the manual labor takes more time, traditional hammer and flat chisel technology can prevent costly damage to the underfloor heating.
Remove tiles with the step-by-step instructions
In the following, we explain step-by-step how to remove tiles easily. Please always be very careful not to injure yourself or the ground.
Mask off the area
Removing tiles inevitably creates a lot of construction dust. It is important to protect the area with tarpaulins and adhesive tape before starting work. You must empty the room where you are removing the tiles. It is also a good idea to close the doors to the adjoining rooms or to mask the doors. It would be best if you also covered the sockets and switches to protect them from dust.
Loosen the first tile
Before you start removing the tiles anywhere, it’s worth putting in a gentle effort. Gently tap the tile center with the screwdriver’s handle to identify a hollow space under the tile. It is the easiest place to start and remove the tile from the joint with the mortise hammer. To do this, place it at the joint at a 45 ° angle, then begin removing towards the center of the tile.
Remove tiles at the correct angle
It is important to ensure that you use a correct 45 ° angle to remove the tiles and avoid damage to the building fabric. At a shallower angle, the tile splinters and makes removing tiles even more difficult. However, if the angle is too steep, you can damage the surface when it is removed. Such damage should be avoided at all costs, especially if there is underfloor heating in the subsurface.
Prepare the substrate for tiling
Did you remove all the old tiles? It would be best if you prepared the substrate for the new floor or wall covering. You will find residues if the handyman used tile adhesive during the last installation. You can remove these residues quickly and easily with a cup grinder. Suppose the tiles lie directly in the mortar bed. In that case, you must use a leveling plaster to ensure that the subsurface is even and allow it to dry thoroughly before further work.
Remove and replace individual tiles
In localized damage to individual tiles, the entire covering does not have to be replaced immediately. Removing broken tiles is not difficult. To do this, you must carefully remove the grout first with a milling attachment. The tile in question is then carefully removed. It would be best if you did this from the center of the tile outward to its edges to avoid damaging the adjacent tiles. Hammer and chisel, but also a milling attachment, are best for this work. Carefully remove the tile fragments and last remaining tile adhesive with a cup grinder. You can then glue in a new tile as a replacement.

Avoid common mistakes when removing tiles
Just knocking on it with a chisel is probably the worst mistake you can make when removing tiles. Pay attention to the preparations to protect the environment and start on a tile with a cavity underneath to make the job easier. Especially if you have underfloor heating, you have to pay attention to a shallow angle with every impact to avoid expensive damage. In this case, it is advisable to find out about the height of the screed or to seek advice from a specialist before starting work.
Material checklist
Removing tile coverings is not complicated, but it requires careful preparation and a sure instinct in the craftsmanship to avoid damage to the sub-floor. If you find out beforehand about the screed height if underfloor heating is installed and take a lot of time to get a feel for the necessary 45° angle, hardly anything can go wrong. However, if you are not sure or have any concerns, you should contact a specialist.
You will need the following materials to remove tiles:
Adhesive tape and cover film
Breathing mask against construction dust
Protective goggles against splintering tile parts
Screwdrivers, chisels
Buckets for rubble
Slippers, rotary hammer or pry hammer with flat chisel attachment
Optional: industrial vacuum cleaner to quickly remove smaller tile parts or glue residues
Cup grinder to remove old tiles
Expert tips: Replace tiles
Be it in the kitchen or the bathroom; tiles can be found in almost every household these days. They have a sophisticated look, are resistant to dirt and moisture, and can be cleaned with little effort. It is more annoying when tiles are damaged and have to be replaced. What should you watch out for if you want to replace damaged tiles?
When do you need a replacement?
Even if tiles have unsightly cracks or parts have flaked off, the tile does not necessarily have to be replaced. First, you can try to repair minor damage to the tiles with the help of a repair kit or mitigate the visual damage. Corresponding repair kits are available in every specialist shop. If the damage is more serious, we recommend replacing the damaged tiles. Experienced do-it-yourselfers can do this job themselves without damaging adjacent tiles. If you are less skilled in your handcraft and do not trust yourself to replace it yourself, you should definitely contact a specialist to have the tiles replaced.
Remove grout or silicone
Do a little preparatory work before removing the damaged tiles. You ensure that you do not damage any other tiles during the work. To do this, first, mask the tile to be removed with painter’s tape until only the joints are exposed. You have to carefully remove the grout or silicone grout to avoid damaging the other tiles too much. With grout, you can use grout knives or multi-tool tools to remove the grout. On the other hand, silicone is easier to remove with a craft knife, spatula, and hammer.
Remove damaged tiles
As long as the preparatory work is done, you can get down to the actual work and replace the tiles. To enable a precise stroke, you must create a starting point first. You create this by knocking a hole in the center of the tile to be removed with a tile hammer. You can then remove the remaining fragments of the tile using a hammer and chisel. Wear the tiles piece by piece. The tile’s outer areas should be worked with a flat chisel so as not to damage adjacent tiles accidentally.
Prepare the new subsurface
After the old tiles have been removed, a little more fine-tuning is required. First of all, dust and lose tile residues should be removed. You can use a broom and a vacuum cleaner for this. Then it is necessary to remove the old tile adhesive. Depending on the adhesive properties, different tools are required to be able to replace the tiles. We recommend the use of a hammer and chisel to remove the tile adhesive completely. For a particularly precise result, you can also use a special cup grinder to level the surface.
Adapt and use the new tiles
It would be best if you first determine the dimensions of the new tiles. Once the tiles are cut, you can mix the tile adhesive. You should always follow the manufacturer’s instructions. The tile adhesive is then applied directly to the previously cleaned surface using a notched trowel. Now insert the new tile carefully. Don’t forget to put wedges between the tiles to ensure even spacing between the old and new tiles. Now you have to wait until the time specified by the manufacturer has passed, and the tile adhesive is cured.
If you want to save yourself the unnecessary effort, you should always keep a supply of original tiles, if possible. It means you can easily replace them in the event of damage without having to look for new, identical tiles.
Grouting the tiles
After you have removed all the damaged tiles and replaced them with new tiles, there is still one small step left to complete the work. Last but not least, the new tiles still have to be grouted. Here, too, you should always follow the manufacturer’s instructions. Apply the grout as recommended by the manufacturer on the joints and remove excess grout with a damp sponge. Suppose it is a matter of tiles with a ceiling or wall termination. In that case, you should fill the expansion joint with silicone instead of a conventional joint compound.
Laying tile on tile is very easy
Tiling requires a stable and load-bearing surface. What would be more suitable than the existing tile covering? Chipping off the old tiles and sanding off the old mortar with a lot of effort, and creating a level surface again is difficult and unnecessary. The process of “laying tiles on tiles” is always applicable, unless you are planning major changes in bathroom renovation anyway and want to make some structural changes. Experience has shown that this is really the case in very few cases.
How to lay tiles on tiles
Depending on which tile adhesive you have chosen, you can now use the ready-mix or stir the adhesive with water. You can use a drill with a mixer to mix the dry mix of the glue. After you have the glue available, apply it to the old tiles with a trowel or trowel and smooth the glue. However, when gluing the tiles on tiles, make sure that the glue can dry quickly. Therefore, you should not apply the adhesive to the entire surface at once, but gradually.
Now that the glue is in place, you can glue the tiles together. Carefully press the tiles down and see if they sit correctly. You can then pound the tiles into place. Do this with every single tile until you re-lay the whole bathroom using the “tile on tile” method.
Finally, the tiles still have to be grouted to compensate for tensions. To do this, get flexible grout and mix it into a mass. Then distribute the grout evenly. The mortar is then additionally pressed into the joint with a joint rubber. Suppose unsightly remains of the mortar are visible on the tiles after grouting. In that case, you can easily remove them with water and a sponge.
Conclusion
Tiles are a very durable floor and wall covering. Tiles last so long that at some point, you don’t like them anymore, or they no longer fit the new bathroom design. For a new tile covering, however, you don’t have to knock off the old tiles. The tile-on-tile system is state of the art today.


