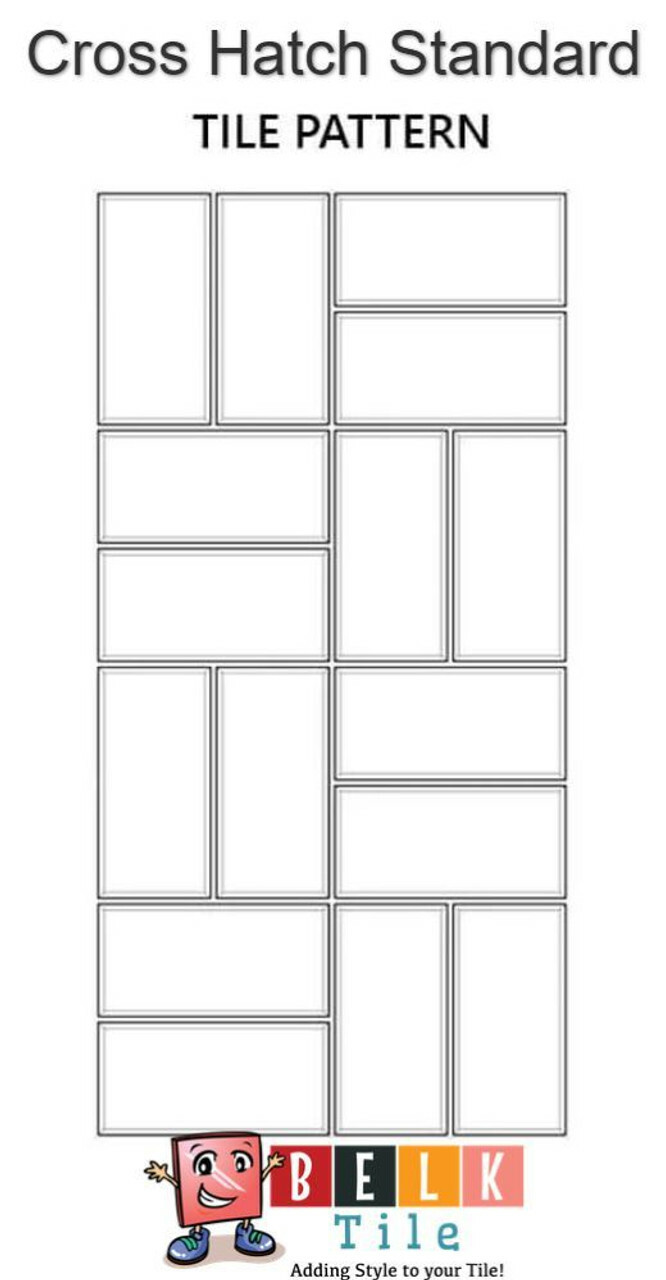
The cross hatch shower wall tile pattern offers a fresh, geometric twist on traditional layouts. By layering horizontal and vertical lines, this design creates a woven, textural effect that enhances bathroom walls with sophistication and depth. Whether you prefer modern minimalism or timeless elegance, the cross hatch layout can bring your shower design to life.
What Is a Cross Hatch Tile Pattern?
In a cross hatch layout, rectangular or square tiles are installed in alternating vertical and horizontal directions. The overlapping effect resembles a woven fabric or basket weave, making it a standout choice for shower walls, niches, and accent areas.
Advantages of the Cross Hatch Layout
- Dynamic texture: Adds movement and dimension to otherwise flat walls.
- Flexible sizing: Works with small or large tiles to achieve different effects.
- Stylish versatility: Pairs well with modern, rustic, or transitional bathroom designs.
- Focal point creation: Perfect for shower feature walls or accent panels.
Best Tile Materials for Cross Hatch Showers
Because the pattern itself is bold, material selection helps define the overall mood of your bathroom.
Ceramic & Porcelain
Durable and cost-effective, ceramic and porcelain tiles are available in a variety of finishes and sizes, making them ideal for cross hatch designs.
Glass Tiles
Glass tiles reflect light beautifully, creating brightness and depth in shower walls—especially when paired with a cross hatch layout.
Natural Stone
Marble, travertine, or limestone tiles add richness and timeless appeal. A cross hatch pattern with stone tiles provides a spa-like, upscale aesthetic.
Design Ideas for Showers
Full Shower Wall Coverage
Use the cross hatch pattern across all shower walls for a striking, high-end look. Subtle tones create calm, while bold contrasts make a dramatic statement.
Accent Wall or Niche Feature
Highlight a single wall, recessed niche, or shower bench with a cross hatch pattern to add interest without overwhelming the entire space.
Mixing Colors and Finishes
Blend matte and glossy tiles or alternate two colors in the cross hatch design for added depth and character.
Grout Color Considerations
Matching grout delivers a seamless, understated appearance, while contrasting grout lines emphasize the woven geometry of the cross hatch layout.
Installation Tips
Cross hatch patterns require precision to ensure clean intersections and balanced lines.
Plan the Layout First
Begin tiling from the center of the shower wall to maintain symmetry and avoid uneven edges. Dry-lay tiles or sketch the layout before installing.
Cutting & Edge Alignment
Because tiles alternate direction, precise cuts are essential along edges and corners. A professional tile saw ensures clean, accurate lines.
DIY vs. Professional Installation
Experienced DIYers can install a cross hatch layout, but hiring a professional ensures perfectly aligned intersections and reduces the risk of costly mistakes.
Care & Maintenance
Maintenance for cross hatch shower tiles depends on the material used. Porcelain and ceramic require simple cleaning, while natural stone may need regular sealing. Non-abrasive cleaners and proper ventilation keep your shower looking fresh and beautiful.
Bring Cross Hatch Elegance to Your Bathroom
The cross hatch shower wall tile design is a sophisticated way to showcase creativity and style in your bathroom. With the right tiles, grout, and layout, you can achieve a look that’s both timeless and unique. Explore BELK Tile’s collection of shower wall tiles to start planning your bathroom transformation today.
Need help choosing tiles or designing your shower wall? Contact BELK Tile for samples, layout guidance, and expert support.


